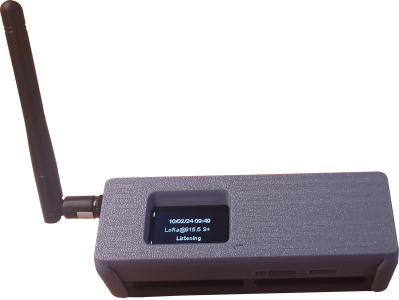
Adding a ChatterBox node to your cluster will provide additional range and resilience to all devices in your cluster. This is also the device I personally add larger antennas and amplifiers to, with good results.
Assembling a ChatterBox Node is pretty straightforward, so long as you have access to a 3D printer and are comfortable flashing firmware (which we try to make pretty simple). Assembly as shown here does require a heat gun, but there is no soldering involved.
3D Print Your Enclosure | You may design or acquire your own enclosure of course, but I suggest using the TS-2 case designed by Alley Cat. They are excellent enclosures and print very well on my Bambu Labs P1S using PLA CF and standard PLA. If you purchase an enclosure from Etsy or another side, make sure the SD card slot is exposed. You will need to be able to insert and remove an SD card, and I’ve found that not all sellers of these cases have that slot exposed. Relevant Files Instructions Case Front Case Back Buttons | |
Gather Your Components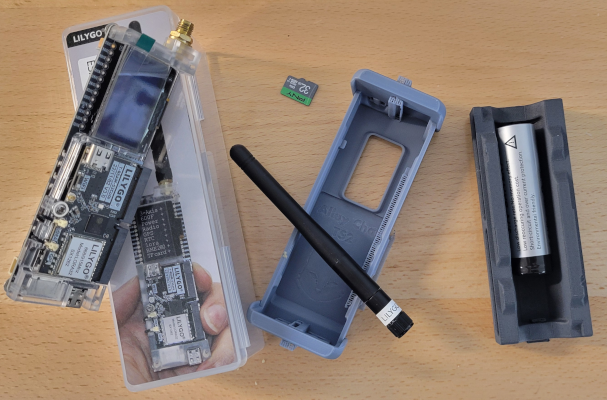 | You will need the a T-Beam Supreme L76K or Ublox, an SD micro card, a compatible battery, heat inset nuts, and M3 screws. Rokland Links T-Beam Supreme Battery (18650) Amazon Product Links: T-Beam Supreme SD Card Battery (18650 flat) Heat Inset Nuts M3 Screws AliExpress Product Links: T-Beam Supreme SD Card Battery (18650 flat) Heat Inset Nuts M3 Screws | |
Insert the Button Panel | Insert the button panel into the area where there are 3 button windows of the case back. You’ll have to sort of hold the case back at an angle to let gravity keep those buttons in place while you snap in the T-Beam in the next step. | |
Insert the T-Beam Supreme | Don’t for get to remove the screen cover, unless you want to leave it on for some reason. The T-Beam snaps into place in this well-designed enclosure. Some other enclosures require you to disassemble the T-Beam, but not this particular case. | |
Place the Heat Set Inserts | There are probably other ways to do this, but to me it’s easiest to: Insert the narrower end of the knurled heat-insert nut into the hole. Apply steady downward pressure onto the nut using a small phillips screwdriver. Apply heat using a heat gun around the nut until the PLA softens enough to let the nut slide into place. If you apply too much heat or heat for too long, you’ll warp the case. | |
Insert T-Beam, SD Card, and Battery | The micro SD card is inserted with the pins (metal) facing the back/open side of the T-Beam. If the case is not aligned well with the SD slot, you will want to fix that before inserting the SD card, or you’ll have trouble pretty quickly. The battery install is pretty straightforward, but just be sure the positive/negatives of the battery are aligned with the T-Beam. Since it’s a flat-ended battery, you have to check the labels. | |
Snap Case Together | At this point, the case should snap together nicely. If not, you may have warped something with the heat gun or the T-Beam may not be fully in place yet. | |
Install the Screws and Antenna | Install the M3 screws into the heat inset nuts to securely fasten the two pieces together. Also, you may install the antenna at this time. | |
Install the Firmware | Follow instructions at the ChatterBox firmware flash site. After successfully flashing ChatterBox firmware onto a T-Deck-based device, you will be prompted to either enter your license key or obtain one. ChatterBox Firmware Flasher | |
| Restart The Device | You may have to completely power the device off and back on, by holding the power button (middle). If everything was successful, you will see the new node waiting to be onboarded to your cluster. |
Since Altware Development LLC is an affiliate of Amazon and AliExpress, purchasing from them using the links on this page help to further development of ChatterBox.